I recently built an application where I wanted to write some arbitrary text onto a video. I was using Expression Encoder 4 and had a difficult time finding some examples and documentation, aside from some basic MSDN documentation on the MediaItem class. I was eventually able to figure it out, but it took a little time. Even though the end result is not particularly glamorous, I thought I’d save you some time and share what I learned.
The first thing to recognize is that you have to create a Bitmap of the text you want to overlay. This Bitmap is then overlayed on to the MediaItem. So, first things first, create your Bitmap. Here’s an approach:
1.  /// <summary>
2.  /// This method will create a bitmap based
3.  /// </summary>
4.  /// <param name="overlayText"></param>
5.  /// <param name="rootPath"></param>
6.  /// <param name="width"></param>
7.  /// <param name="height"></param>
8.  /// <returns></returns>
9.  private static string createOverlayImage(string overlayText, string rootPath, int width, int height)
10. {
11.     // full path for a temporary bitmap
12.     string overlayFileName = rootPath + "\\" + Guid.NewGuid().ToString() + ".bmp";
13.
14.     // create a bitmap
15.     Bitmap bitmap = new Bitmap(width, height);
16.     Graphics g = Graphics.FromImage(bitmap);
17.
18.     // define the font
19.     Font font = new Font("Arial", (float)14.0);
20.
21.     // define the area to draw on
22.     Rectangle area = new Rectangle(new Point(0, 0), new Size(width, height));
23.
24.     // draw the new image
25.     g.TextRenderingHint = System.Drawing.Text.TextRenderingHint.AntiAlias;
26.     g.DrawString(overlayText, font, Brushes.Red, area);
27.
28.     // save the picture with the text overlay
29.     bitmap.Save(overlayFileName);
30.
31.     // return the path to the overlay image
32.     return overlayFileName;
33. }
Nothing too surprising here:
- Line #9: Pass in the text you want to overlay, the path for where you’ll store the created bitmap, and the width/height.
- Line #12: Create a random file name for the Bitmap.
- Line #26: You can change the font, color, and locations here if you’d like.
Now, with this method, you can set the overlay properties on the MediaItem like this:
1.  // sets file name to media item
2.  mediaItem = new MediaItem("test.wmv");
3.
4.  // create the overlay image and return the path
5.  string overlayFileName = createOverlayImage("Thank you for encoding this video!", Environment.CurrentDirectory, mediaItem.VideoSize.Width, mediaItem.VideoSize.Height);
6.
7.  // create the overlay on the media item
8.  mediaItem.OverlayFileName = overlayFileName;
9.  mediaItem.OverlayLayoutMode = OverlayLayoutMode.WholeSequence;
10. mediaItem.OverlayRect = new Rectangle(new Point(30, 10), new Size((mediaItem.VideoSize.Width - 30), (mediaItem VideoSize.Height - 10)));
Breaking it down:
- Line #5: Grab the full path to the newly created Bitmap over your text overlay.
- Line #8: Set the OverlayFileName to your Bitmap.
- Line #9: Choose the layout mode. There are a few options here that you can explore; details are on MSDN.
- Line #10: The OverlayRect defines where your Bitmap lives on the video. I indented it a bit, but it’s up to you.
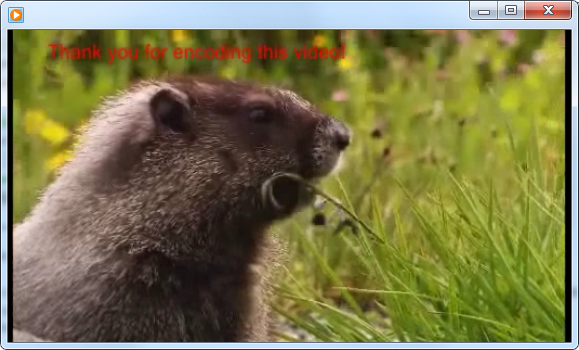
I’ve modified the Simple template provided by the Expression Encoder 4 SDK with the code. You can find it below. Hope this helps.